
explainer
JPEG vs PNG vs WebP: Which Image Format to Use (and How to Shrink Files 90%)
By Uttam Regmi · Published 2026-07-05 · Updated 2026-07-05 · 7 min read · Fact-checked, sources cited
The format rule is short: JPEG for photos, PNG for screenshots and anything transparent, WebP when you control the destination and want 25-35% smaller files, and the biggest size win isn’t the format at all, it’s resizing to the dimensions you actually display. All three conversions run locally in the image converter, with the trade-offs surfaced instead of silently applied.
Why three formats exist
Each format is a different bet about what’s in the image:
JPEG bets on photographs: smooth gradients, natural noise, no sharp synthetic edges. Its lossy compression discards fine detail the eye doesn’t resolve, brilliantly for photos, badly for text, which comes out with fuzzy “mosquito” halos. No transparency support. Universal since the 1990s.
PNG bets on graphics: flat color runs, hard edges, text, compressed losslessly, plus full alpha-channel transparency. The same properties make it terrible at photos: lossless encoding of photographic noise produces files several times the JPEG equivalent.
WebP is the modern generalist: lossy mode compresses photos ~25-35% smaller than JPEG at equivalent quality (Google’s format documentation), a lossless mode covers graphics, and both support transparency. Supported by every current browser; its residual weakness is older desktop software and the occasional upload form that rejects it.
The reason each format wins its niche comes down to what its compression assumes:
| Format | Introduced | Compression | Transparency | Best at | Weak at |
|---|---|---|---|---|---|
| JPEG | early 1990s | lossy (DCT) | none | photographs | text, sharp edges, alpha |
| PNG | mid-1990s | lossless (DEFLATE) | full alpha | graphics, text, screenshots | photographs (huge files) |
| WebP | 2010 | lossy and lossless | full alpha | almost everything on the web | old software, some upload forms |
The decisions, as a table
| You have | Use | Why |
|---|---|---|
| Photograph for anywhere | JPEG q75-85 | universal, small, no visible loss |
| Photograph for your own site | WebP q75-85 | ~30% smaller than the JPEG |
| Screenshot with text | PNG | lossless keeps text razor-sharp |
| Logo/icon with transparency | PNG (or WebP) | JPEG can’t do alpha at all |
| Diagram, chart, flat-color art | PNG | flat runs compress losslessly and small |
| Photo that needs transparency | WebP | the only good lossy + alpha combo |
How lossy compression actually works
Understanding why JPEG and WebP shrink photos so well, and why they mangle text, makes the format choice obvious rather than something to memorize.
Both formats split the image into small blocks and transform each one into frequencies (a discrete cosine transform, in JPEG’s case): a few numbers describing broad tone plus many describing fine detail. The human eye is far more sensitive to brightness than to subtle color shifts and barely notices the highest-frequency detail, so the encoder throws away the parts you won’t miss and keeps the rest. A photo of a face has smooth gradients everywhere, so almost everything discarded is genuinely invisible. The quality slider is just a dial on how aggressively that detail gets discarded.
Text and logos break this bet completely. A crisp black letter on white is nothing but high-frequency detail, the exact thing the encoder is tuned to delete. The result is the fuzzy grey “mosquito noise” you see around type in a JPEG screenshot. PNG’s lossless approach instead finds repeated runs of identical color (a solid background, a flat button) and stores them as short instructions, so a screenshot with large flat areas compresses to a small file and stays pixel-perfect.
Two practical consequences follow. First, JPEG and WebP also throw away color resolution through chroma subsampling, another reason thin colored text and red-on-black graphics look muddy in those formats. Second, because the discarded detail is gone for good, every re-save compounds the loss, which is why the conversion rules below matter.
The 90% workflow: resize, then compress
File size scales with pixel count times bytes-per-pixel, so attack both:
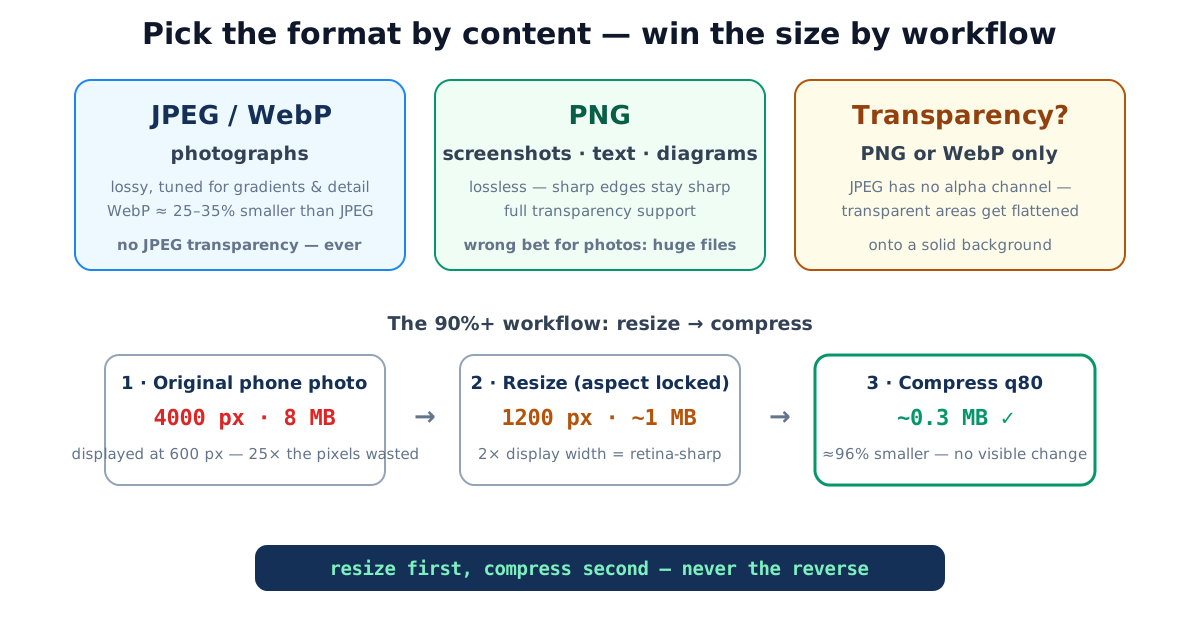
- Resize to display size. A phone photo is ~4000px wide; a blog column shows ~800-1200px. The image resizer with aspect lock on takes it down, halving both dimensions alone removes ~75% of the pixels. (For sharp high-DPI screens, target 2× the CSS display width.)
- Compress at quality 75-85. The image compressor shows before/after sizes live, so you can walk the slider down and stop the moment quality visibly dips.
Worked example: an 8 MB, 4000×3000 phone photo destined for a 600px-wide product listing. Resize to 1200×900 (retina-ready) → ~1 MB territory; compress as JPEG at quality 80 → around 0.2-0.4 MB depending on content. That’s a ~95% reduction with no visible difference where it’s actually displayed, and it uploads, loads and emails ten times faster.
The order matters: compressing first then resizing throws away quality twice. And both steps re-encode through the canvas, which strips EXIF metadata as a side effect, a privacy bonus covered in the photo metadata guide.
What each quality setting is actually for
The quality number isn’t a percentage of anything you can see, it’s an encoder setting, and the same value behaves slightly differently across formats. As a practical guide for photographs:
| Quality | Looks like | Use it for |
|---|---|---|
| 90-100 | visually lossless, large files | editing masters, print, images you’ll re-export |
| 80-90 | no visible loss at normal viewing | hero images, product shots, anything prominent |
| 70-80 | the everyday sweet spot | most web images, blog photos, thumbnails at 2× |
| 60-70 | faint artifacts in gradients and fine detail | large galleries where total page weight matters |
| below 60 | visible blocking and banding | avoid for photos; acceptable only for tiny previews |
Walk the slider down from 85 rather than up from 50, the first few steps cost almost nothing in appearance but a lot in file size, and you stop the moment quality visibly dips.
One format beyond WebP: AVIF
If you control the destination and want to go further, AVIF (built on the AV1 video codec) often beats WebP again at the same visual quality, especially on detailed photos and gradients. It supports transparency and both lossy and lossless modes. The trade-offs are that encoding is slower and browser support, while now broad across current Chrome, Firefox and Safari, is a step behind WebP’s near-universal reach. Treat it as the aggressive option for your own site once WebP is already in place, not as a safe universal export.
Conversion rules that prevent ruined images
- Quality flows one direction. JPEG → PNG doesn’t restore anything; it embalms the existing loss in a bigger file. Keep originals; convert from them.
- Transparency needs an alpha-capable target. Converting a transparent PNG to JPEG flattens it onto a background, the converter warns you and uses white, but the real fix is choosing WebP or staying PNG.
- Don’t re-save JPEG repeatedly. Each save is a fresh lossy pass; after several edit-save cycles the damage compounds visibly. Edit from the original, export once.
- Screenshots deserve PNG even though they’re “images”. The content (text, UI edges) is graphics, not photography, JPEG is the wrong bet for it at any quality.
Common format mistakes
- Photos stored as PNG, the most common multi-megabyte waste; convert to JPEG/WebP.
- Text-heavy images as JPEG, fuzzy halos around every letter; use PNG.
- Compressing without resizing, quality 60 on a 4000px image is worse and bigger than quality 80 on a properly sized one.
- Uploading to a converter site, the browser already contains the codecs; local tools do this without your photos travelling.
- Quality 100 “to be safe”, visually identical to 85-90 for most photos at several times the size; reserve it for editing masters.
Quick summary
Match the format to the content, JPEG/WebP for photographs, PNG for text, graphics and transparency, and get your real savings from the resize-then-compress workflow: size to actual display dimensions in the resizer, then walk quality down to ~80 in the compressor while watching the live size readout. Convert between all three formats in the converter, everything local, nothing uploaded, no watermark.
Related tools: image to Base64 · image metadata remover. WebP compression figures are from Google’s WebP documentation.
Frequently asked questions
Which image format should I use for photos?
JPEG for universal compatibility, WebP when the destination is the web, WebP achieves the same visual quality around 25-35% smaller. Never PNG for photographs: it's lossless, so photographic noise makes the file several times larger for no visible gain.
Which format for screenshots, logos and diagrams?
PNG, flat colors, sharp edges and text are exactly what its lossless compression handles well and what JPEG's photo-tuned compression visibly smears (fuzzy halos around text). WebP in lossless mode also works.
Does converting JPEG to PNG improve quality?
No, JPEG's losses are baked into the pixels at save time. Converting to PNG stores those same degraded pixels losslessly in a much larger file. Quality only ever moves one way: convert from the best original you have.
What JPEG/WebP quality setting is 'safe'?
75-85 is the standard sweet spot for photos, typically a fraction of the original size with no visible difference at normal viewing. Use 90+ only for printing or files you'll edit again; below ~60, artifacts start showing in gradients and detail.
Why did my transparent logo get a white box after conversion?
JPEG has no alpha channel, so transparency must be flattened onto a solid background. That's a format limitation, not a tool setting, keep transparency in PNG or WebP.
Is compressing an image the same as resizing it?
No, and combining them is the trick: resizing reduces the pixel count (file size scales roughly with it), compression reduces bytes per pixel. Resize a 4000px photo to the ~1200px it displays at, then compress at quality 80, that's routinely a 90%+ reduction.
Do these conversions upload my images?
Not on LazyTools, browsers ship full codecs for JPEG, PNG and WebP, so compressing, converting and resizing all run on your device. Upload-based converter sites exist for their ads, not for any technical reason.