
how-to
How to Reduce Image Size to KB (Under 50 KB)
By Uttam Regmi · Published 2026-07-28 · Updated 2026-07-28 · 6 min read · Fact-checked, sources cited
To reduce an image to a target KB, you lower the JPEG (or WebP) encoder quality and, if needed, shrink the pixel dimensions, a good tool binary-searches the quality to find the highest setting that still fits under your limit. That is the whole trick behind getting a photo “under 50 KB” or “between 20 KB and 100 KB” for a form. You do not have to guess: point a resize image to KB tool at your file, type the target, and it hits it automatically.
KB vs pixels: what actually controls file size
File size and dimensions are two different things, and mixing them up is the most common reason people get stuck. Pixels are how wide and tall the image is, say 3000×4000. KB is how much space the saved file takes on disk.
A single set of pixels can be saved as many different file sizes depending on how hard it is compressed. That is why a form says “photo must be under 50 KB” and not “photo must be 600 pixels”. It cares about the bytes it has to store.
So you have two levers. Quality (how aggressively the JPEG/WebP encoder throws away fine detail) and dimensions (how many pixels there are to encode). Lowering either one lowers KB. A good size-reducer pulls the quality lever first because it keeps your framing, and only touches dimensions when it has to.
This also explains a frustration people hit with basic resizers: shrinking a photo to smaller pixels helps, but a “resize” tool that never re-compresses can still leave you above the cap. Targeting KB directly is what closes that gap.
How to hit an exact KB target
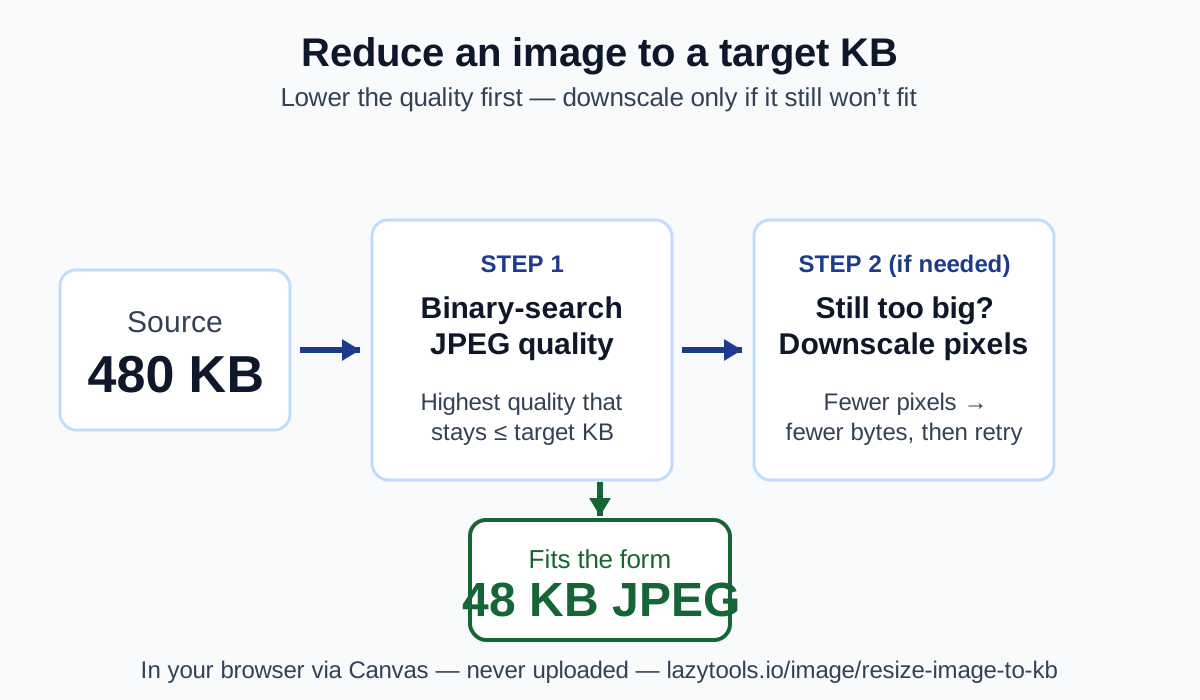
The tool re-encodes your image several times to find the best fit. You do not tune anything by hand. Here is what happens under the hood.
First it converts your target to bytes: 1 KB = 1024 bytes, so 50 KB is 51,200 bytes. Then it runs a binary search on the encoder quality. It tries a middle quality, checks the resulting file size, and narrows in, going higher if there is room to spare, lower if it overshot, until it lands on the highest quality that still comes in at or under your target. That maximises how good the photo looks while respecting the limit.
If even the lowest quality is still too big, common when a huge, detailed photo has to fit a tiny cap, the tool switches to the second lever. It progressively downscales the pixel dimensions and repeats the quality search, shrinking a bit more each pass until the file finally fits. Fewer pixels means fewer bytes, so a target that was impossible at full resolution becomes easy once the image is smaller.
The result: you type “50 KB,” and you get back a JPEG that is at or just under 50 KB, as sharp as that limit allows.
JPEG vs WebP vs PNG for a size limit
For hitting a small KB target on a photo, JPEG is the safe default and WebP is the efficient one; PNG is usually the wrong choice. The difference is how each format trades quality for size.
| Format | Best for | Hitting a KB target | Form acceptance |
|---|---|---|---|
| JPEG | Photos, scans, ID photos | Excellent, quality is fully adjustable | Universal; safest for strict portals |
| WebP | Photos where size is tight | Excellent, ~25-35% smaller at equal quality | Wide, but a few older portals reject it |
| PNG | Logos, line art, transparency | Poor, lossless, can’t trade quality for size | Fine, but files stay large for photos |
Use JPEG when the form is strict, passport, visa, exam and government portals almost always accept it, and it is the format they expect. Reach for WebP when you want the smallest possible file at a given sharpness and you have confirmed the form accepts it. Avoid PNG for a small photo target: because it is lossless, it cannot shed quality to shrink the way JPEG and WebP can, so it fights you the whole way down.
When the target is too small
If a big, detailed photo won’t hit a tiny target without looking soft, you have two clean fixes. Both reduce how much the compressor has to throw away.
Crop first. A tight target is really a “too many pixels” problem. If you crop the image, trimming background around a face for a passport photo, for example. There are simply fewer pixels to encode, so the same visual quality now fits in fewer KB. Our crop image tool does this locally, and it is often the single best move before compressing.
Raise the target slightly. If the form allows a range (“20-100 KB”), aim nearer the top. A 90 KB JPEG looks noticeably cleaner than a 25 KB one, and both satisfy the rule. Do not force the smallest possible file when the form does not require it.
If you would rather nudge the quality slider yourself and watch the size change live, the image compressor gives you manual control instead of an automatic target.
Common mistakes
The errors below waste the most time, and every one comes from treating KB and pixels as the same knob.
- Confusing KB with dimensions. Resizing to “600×600 pixels” does not guarantee “under 50 KB.” Dimensions influence size, but compression sets the final bytes. If the form asks for KB, target KB.
- Using PNG for a photo target. People export a passport photo as PNG, see 400 KB, and panic. PNG can’t trade quality for size, switch to JPEG.
- Upscaling to “improve” the photo. Enlarging a small image adds pixels but no real detail; it inflates the file and can trip a max-dimension rule. Never upscale to meet a size cap.
- Over-compressing, then re-saving repeatedly. Each JPEG save discards a little more detail. Compressing an already-compressed file again stacks artifacts. Always start from the original and compress once to your target.
- Ignoring the exact byte math. A form that says “50 KB” almost always means 50 × 1024 = 51,200 bytes, but a strict portal occasionally counts in flat 1000-byte kilobytes. If an upload is rejected at the edge, aim a KB or two under the stated cap.
Do it privately in your browser
Because the photo you are shrinking is often a passport, visa or ID, where it gets processed matters as much as the result. The resize image to KB tool runs entirely on your device using the Canvas API and the browser’s built-in image codecs, the file is never uploaded, and the tool works offline. You pick the format and target; your browser does the re-encoding locally and hands you the finished file. No server ever sees the image.
The resize-to-KB tool re-encodes images with the browser’s Canvas API and native JPEG/WebP codecs entirely on your device; the file is never uploaded. Exact KB results depend on the image, the tool finds the highest quality at or under your target and downscales only if needed. This is general how-to information.
Frequently asked questions
How do I reduce an image to under 50 KB?
Open the image in a target-size tool, type 50 KB, and let it re-encode the photo as JPEG at a lower quality until the file fits. If the lowest quality is still too big, the tool downscales the pixel dimensions and tries again. A browser-based tool does this locally, so your photo is never uploaded.
What is the difference between KB and pixels or resolution?
Pixels are the width and height of the image; KB is how many kilobytes the file takes on disk. A 2000x2000 photo and a 500x500 photo can both be saved at different file sizes depending on the compression. Forms cap KB, not pixels, so you reduce KB by compressing harder and, if needed, shrinking the dimensions.
Why can't the tool reach my target size?
If the target is very small and the photo is large and detailed, even the lowest JPEG quality may not fit. The tool then downscales the pixel dimensions and retries. If it still struggles, crop the image so there are fewer pixels to encode, or raise the target by a few KB.
Should I use JPEG or WebP for a size limit?
Use JPEG when the form is strict. It is universally accepted for photos and IDs. WebP is roughly 25 to 35 percent smaller at the same visual quality, so it hits small targets with less softness, but a few older portals reject it. When in doubt, submit JPEG.
Does reducing image size ruin quality?
Reducing size trades some detail for a smaller file, but a moderate target on a normal photo is usually indistinguishable. Quality only becomes visibly soft when you force a very small target onto a large, detailed image. Cropping first or raising the target a little keeps it looking clean.
Is my photo uploaded to compress it?
Not with a client-side tool. The resize-to-KB tool uses the browser's Canvas API and built-in image codecs to re-encode the photo on your device, so the file, often a passport or ID, never leaves your machine and it works offline.