
how-to
How Many Boxes of Flooring Do I Need?
By Uttam Regmi · Published 2026-07-28 · Updated 2026-07-28 · 6 min read · Fact-checked, sources cited
To work out how many boxes of flooring you need, add a waste allowance to your room area, divide by the coverage printed on each box, and round up. That is the whole answer to “how many boxes of flooring do I need?”: measure the floor, pad it for offcuts, and split it into boxes. A 20 m² room with boxes covering 2 m² each and a 10% waste allowance works out at (20 × 1.10) ÷ 2 = 11 boxes. You round up because you can never buy part of a box.
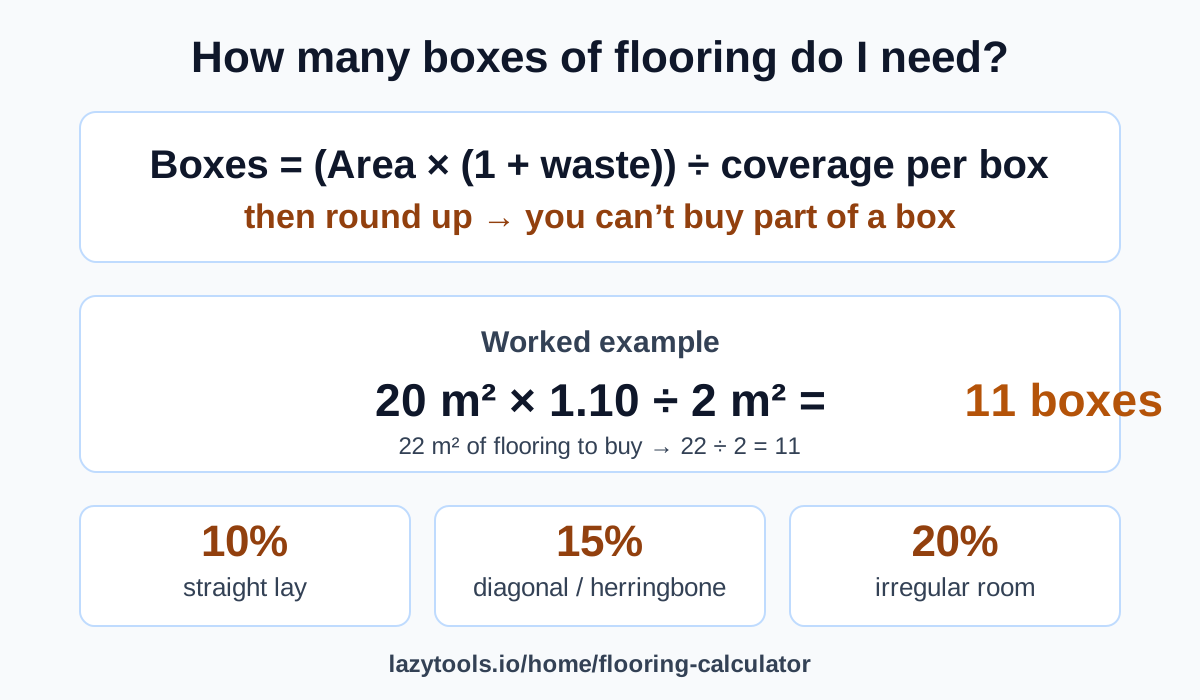
The flooring box formula
Every flooring order comes down to three numbers: how much floor you have, how much you’ll waste as offcuts, and how much one box covers. Put them together and you get:
boxes = ceil( (room area × (1 + waste%)) ÷ coverage per box )
The “ceil” is just shorthand for round up to the next whole box. Work through the 20 m² example one step at a time:
- Room area: 20 m² (a 5 m × 4 m rectangle).
- Add waste: a straight lay needs about 10%, so 20 × 1.10 = 22 m² of flooring to buy.
- Divide by coverage: each box covers 2 m², so 22 ÷ 2 = 11.
- Round up: 11 is already whole, so you need 11 boxes.
If the coverage had been 2.2 m² per box instead, step three would give 22 ÷ 2.2 = 10 exactly, still 10 boxes. Change the room to 23 m² and you’d get (23 × 1.10) ÷ 2 = 12.65, which rounds up to 13 boxes. The flooring calculator runs these steps for you and never forgets to round up, which is the step most people get wrong on paper.
The one rule that keeps this honest: coverage per box and room area must be in the same unit. If your box says “24 ft² per box,” measure your room in feet. Mixing square metres with square feet is the fastest way to order twice as much flooring as you need, or half.
How much waste to add
The waste allowance covers the planks you cut to fit against walls, around doorways and into corners, the leftover pieces you can’t reuse. Simpler layouts waste less; fiddly patterns and rooms full of angles waste more.
| Layout | Waste allowance |
|---|---|
| Straight lay, plain rectangular room | 10% |
| Diagonal or herringbone pattern; many doorways or angles | 15% |
| Very irregular space | up to 20% |
A straight lay in a plain rectangle is the most forgiving: planks run wall to wall and offcuts from one row often start the next. Turn the boards diagonally, or lay them in a herringbone pattern, and every plank gets cut at an angle, so 15% is safer. Rooms with lots of doorways, bay windows or odd corners land in the same bracket. For a genuinely awkward space, think alcoves, a fireplace hearth and a bay all in one room, push toward 20%. It is far cheaper to have a few spare planks than to run short with three rows left to lay.
Area to boxes at a glance
Here is the formula worked out across common room sizes, assuming 2 m² coverage per box and a 10% straight-lay waste allowance, each figure rounded up to a whole box:
| Room area | Boxes needed |
|---|---|
| 10 m² | 6 |
| 15 m² | 9 |
| 20 m² | 11 |
| 25 m² | 14 |
| 30 m² | 17 |
| 40 m² | 22 |
Read these as a sanity check, not gospel: your boxes almost certainly cover a different area, and a diagonal layout would nudge every row upward. If your own coverage figure is 2.2 m² or 24 ft², the counts will shift, which is exactly why it pays to run your real numbers rather than eyeball a chart.
Measuring odd-shaped rooms
The formula assumes one tidy area, so the trick with an awkward room is to break it into rectangles. For a simple rectangle, area is just length × width. For an L-shaped room, draw a line to split the L into two rectangles, measure the length and width of each, multiply to get each area, then add them together:
total area = (rectangle 1 length × width) + (rectangle 2 length × width)
Feed that combined total into the formula as your room area, then add the waste allowance once at the end, not to each rectangle separately. The same approach handles a hallway that branches off a lounge, or a room with a chimney breast: measure the main rectangle, measure the breast, and subtract the breast if the floor doesn’t run behind it. When in doubt, sketch the room on paper and label every measurement before you start multiplying.
Common mistakes
- Forgetting the waste allowance. Ordering exactly your floor area leaves nothing for offcuts. You’ll run out before the last wall, every time.
- Rounding down. 10.2 boxes is not 10 boxes; it’s 11. Rounding down is the classic way to end up one plank short.
- Mixing units. Coverage in ft² with a room measured in m² gives nonsense. Convert first, or measure everything in the unit printed on the box.
- Buying different batch numbers. Dye lots vary between production runs. Order all your flooring from one batch or lot number so the colour matches across the whole floor.
- Leaving no spares. Keep one or two planks back after fitting. A future scratch or water spill is far easier to fix from your own leftovers than from a discontinued line.
Order the right number in seconds
The maths is quick once you know it: pad your room area for waste, divide by the coverage on the box, and round up. Rather than juggle the waste percentage and the rounding yourself, drop your measurements into the flooring calculator. It applies the waste allowance, divides by your coverage per box, rounds up to whole boxes and works entirely in your browser with nothing uploaded. For the rest of your project, browse the Home & DIY tools or see our guide to estimating materials so every order lands right the first time.
Educational estimates for planning a flooring order. Always confirm the exact coverage and batch number printed on your chosen product before buying, and keep spare planks for future repairs.
Frequently asked questions
How many boxes of flooring do I need?
Take your room area, add a waste allowance (about 10% for a straight lay), divide by the coverage printed on each box, then round up because you can't buy part of a box. For a 20 m² room with boxes covering 2 m² each and 10% waste: (20 × 1.10) ÷ 2 = 11 boxes.
How much waste should I allow for flooring?
Allow about 10% for a simple straight lay in a rectangular room, 15% for diagonal or herringbone patterns or rooms with many doorways and angles, and up to 20% for very irregular spaces. More complex layouts create more offcuts that you can't reuse.
What is coverage per box?
Coverage per box is the floor area that one box of planks will cover, printed on the packaging, for example 2.2 m² or about 24 ft² per box. Always use the same unit for coverage and for your room area, or the maths won't line up.
Should I keep spare flooring?
Yes. Keep at least one or two spare planks after fitting so you can replace a damaged board later without a colour mismatch. Buy everything from one batch or lot number, because dye lots vary slightly between production runs.
How do I measure an L-shaped room?
Split the L-shape into two rectangles, measure the length and width of each, multiply to get each area, then add them together. Use that combined area as your room area before adding the waste allowance.
Do I round the number of boxes up or down?
Always round up. Flooring is sold by the box, so if the maths gives 10.2 boxes you need 11, rounding down leaves you short partway through the job and risks a colour mismatch when you reorder.